Setup a Laravel 7.x app
Laravel has a great documentation and explains how to get up and runing with laravel. Let go through the steps quickly. We will be using composer to install Laravel
Installing via Composer
If you haven't already have composer installed please visit installing composer globally on Mac OS or visit composer getting started page for setup instructions.
Once you have composer installed, you can pull in the latest copy of Laravel like so.
composer create-project --prefer-dist laravel/laravel forgelaravelPush project to Github
Once Laravel has successfully installed all its dependencies etc. lets go ahead and make our initial commit to Github or any other source control such as Bitbucket, Gitlab etc. you're using.
git add .
git commit -m "initial commit for forgelaravel app"
git push origin master
Laravel Forge - Set up server
Great! now that we have our Laravel project setup and pushed to git, we can go ahead and setup the project in Laravel Forge. Forge allows us to deploy our application to our server. If you haven't already got an account with them, you can sign up here, its pretty straight forward and you'll be up and running in minutes. In this case we will be deploying our app to AWS (Amazon Web Services).
Once you login, you will see a list of servers to deloy to like so.
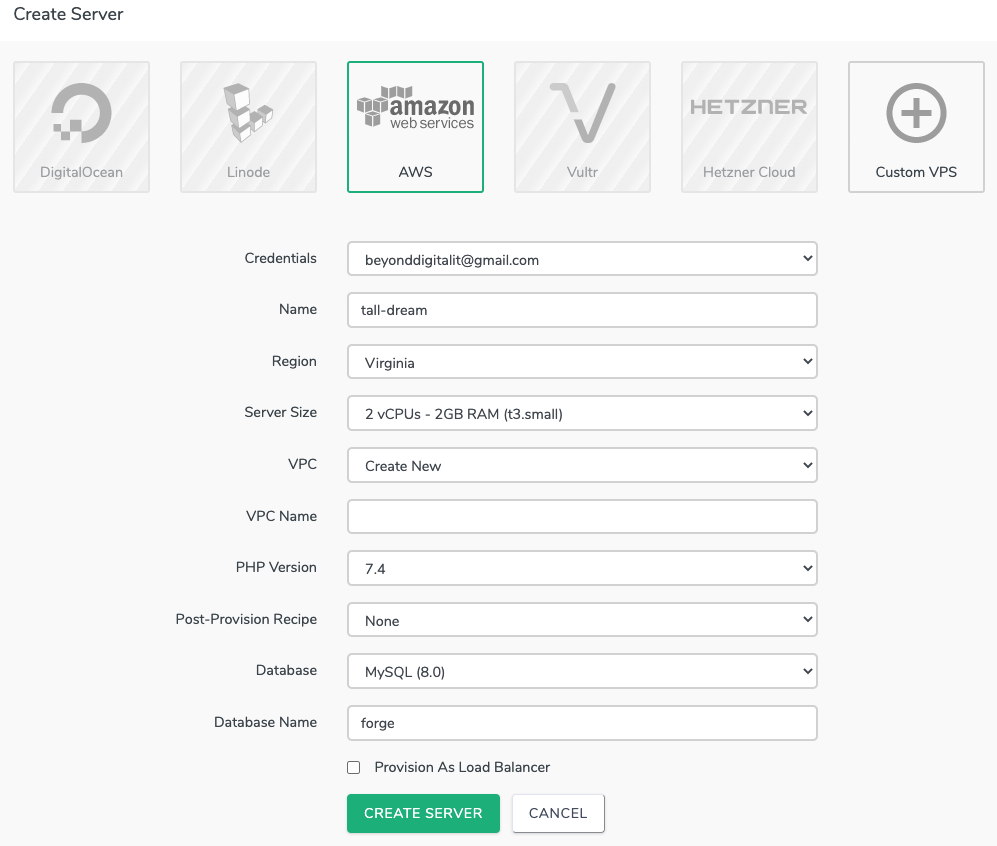
Click on AWS and fill in the details below. You can leave most of the options as default. However you may wish to choose the right Server size for your application. For a basic Laravel app we can stick with the defaults. For VPC name, i usually use the same name as the instance. You can give it any name. Finally enter the Database name and click Create Server. It should take somewhere between 5 - 10 minutes to get everything setup.
If everything went well, you'll see the server added to the dashboard with an Active status like so.

AWS elastic IP setup
It's best to assign an Elastic IP to you AWS instance and update the server IP in Laravel Forge. If you want to know how to allocate an Elastic IP, read this article.
Create a site in Forge
Next, lets create a site for our project. To create a site, click on your Server name from your dashboard. This will take you to the create site screen as shown below.
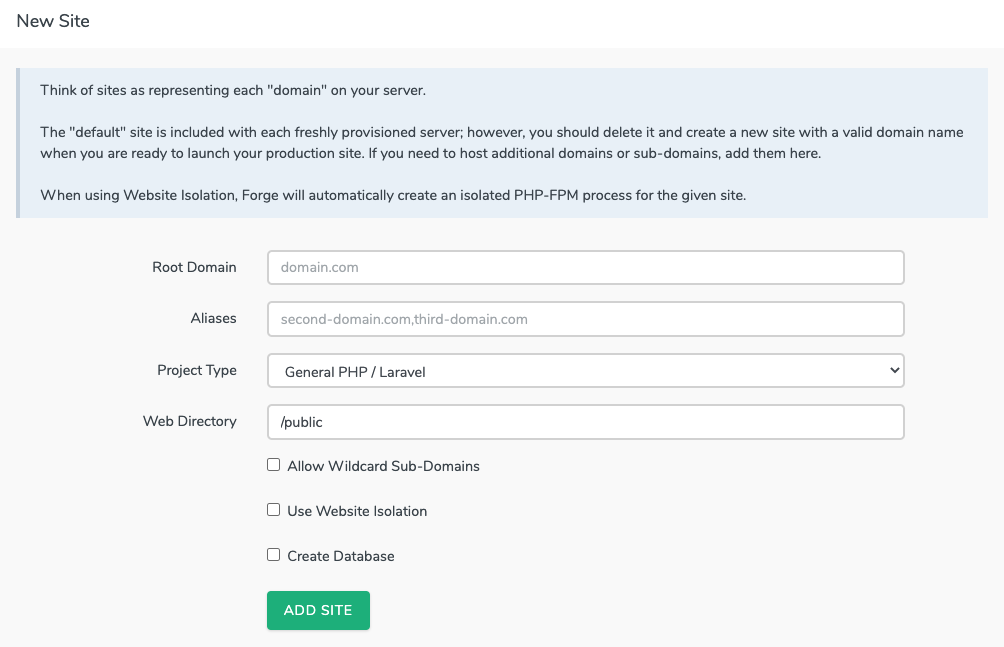
For options enter the details as shown below and click ADD SITE:
- Root Domain: example.com
- Aliases: your aliases or leave blank
- Project Type: General PHP / Laravel
- Web Directory: /public
If you're using Github like we do in this case. We can link our account to Github. You can do this by going to your Account settings and then clicking on Source Control. Choose Github and follow the instructions. When this is done go back to the site setting screen and click on git repository as shown below.

Now enter your Github accountname/repositoryname to connect to a Git repo. Once you have done so successfully you will see the Deploy screen like so.
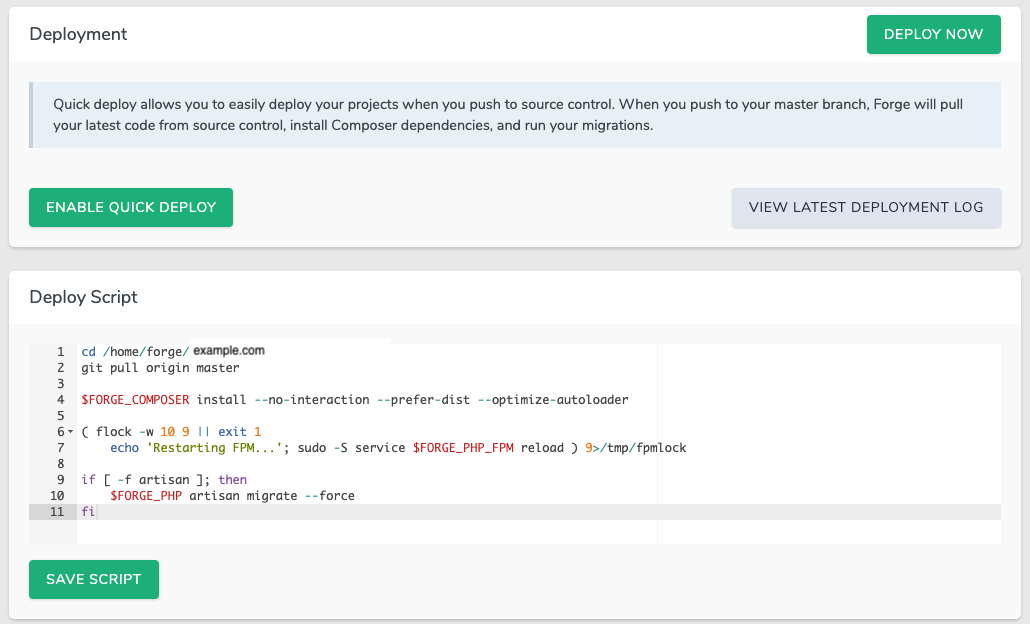
You can go ahead and tweak the deployment script to your liking, in this case all we need to do is, git pull origin master branch, run composer and then finally migrate our database. For more complex deploy script you can take a look at the documentation. Our app is a basic one so we'll stick with the basic deploy script.
CI / CD with Github actions
You could at this point, just click DEPLOY NOW button and our app will be checked out form Github repo master branch and deploy to our example.com site on the server. But we want to create a workflow using Githib actions and allow it to be responsible to trigger the deploy process in Laravel Forge. Lets continue and see how we do this.
Log into you Github account and go to our created project repository. In here you will see an option called Actions click on it and you will see the workflow setup screen as shown below.

Github out of the box gives us a simple Laravel workflow to work with. Click on the Set up this workflow button under the Laravel section. You'll see the workflow screen.
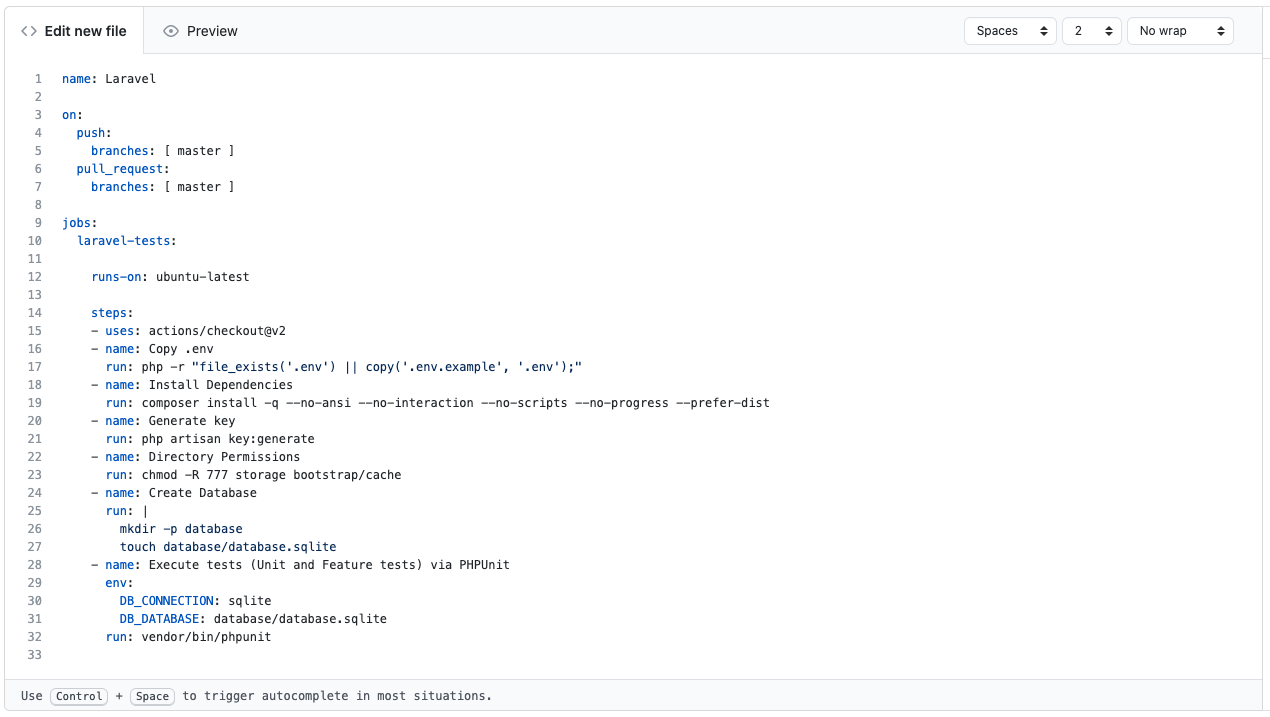
The laravel.yaml file you see in the screenshot above is where we would define our workflow. The workflow indicates that it will run on Push and Pull Request to the master branch. The default workflow is fine for a simple Laravel app, however we will also be setting up a deployment trigger to run when all tests have passed and the app is ready to be deployed to the server.
In order to set up the Deploy trigger we need to do a couple of things. In Github go to the settings tab. Here we need to add the deploy key as shown below.
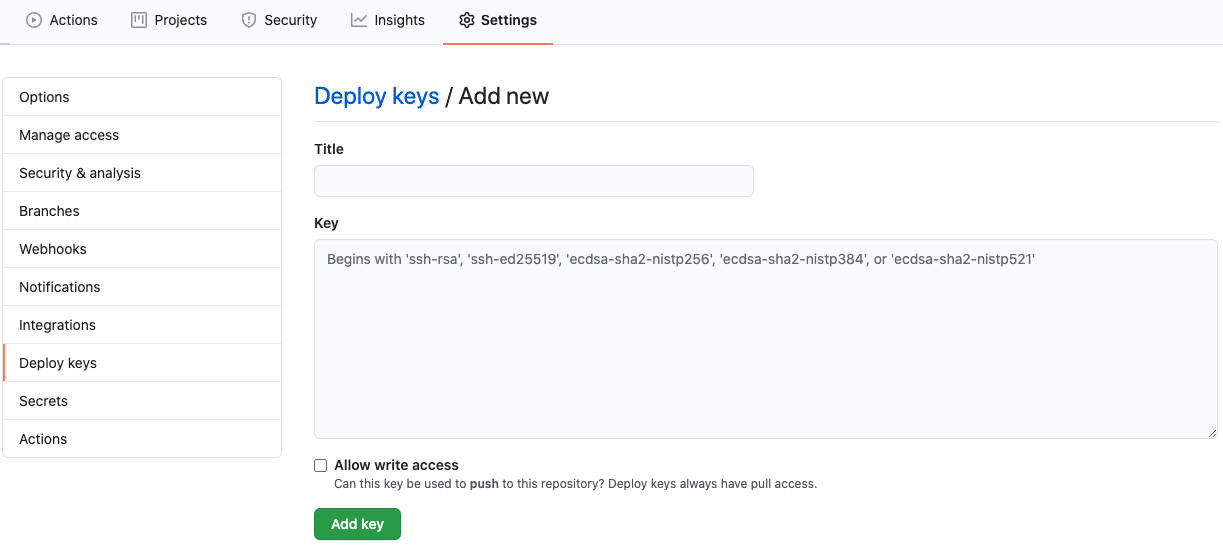
Create ssh keys
If you already have the private / public RSA keys installed on your Mac then copy the contents of your public key and paste in the key field. You can call it whatever you want. If you don't ave one, use the command below to generate one.
ssh-keygen -t rsaFor passphrase, i usually leave this blank but it is a good practice to add one if you want. Running the above command will install the keys in your ~/.ssh folder.
Github actions secret
Next, we need to add a secret that we'll use in our laravel.yaml file. To add the secret click on the Secrets menu item, you'll find this just below the Deploy keys menu item.
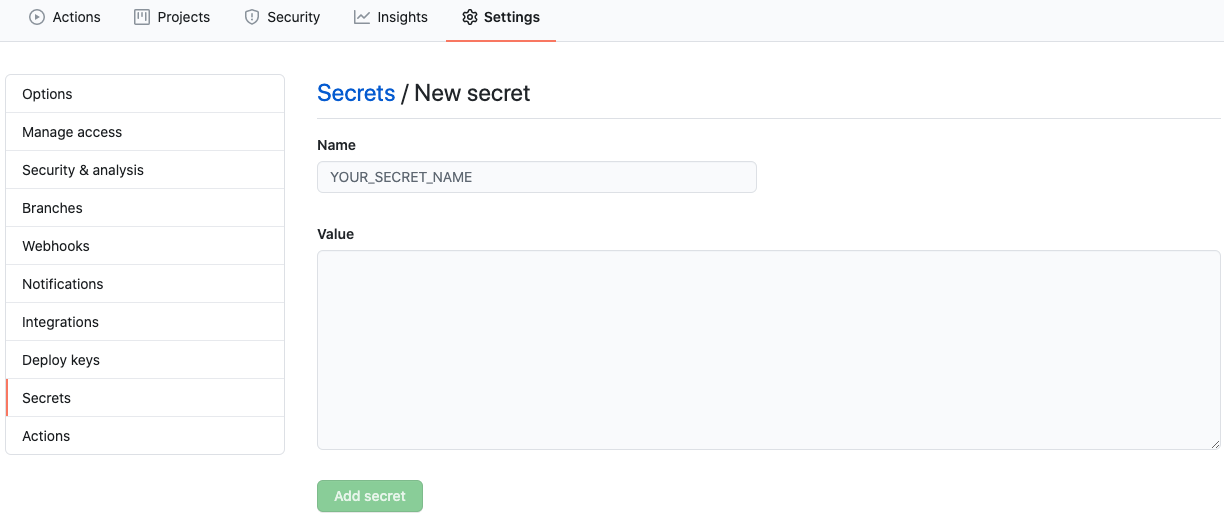
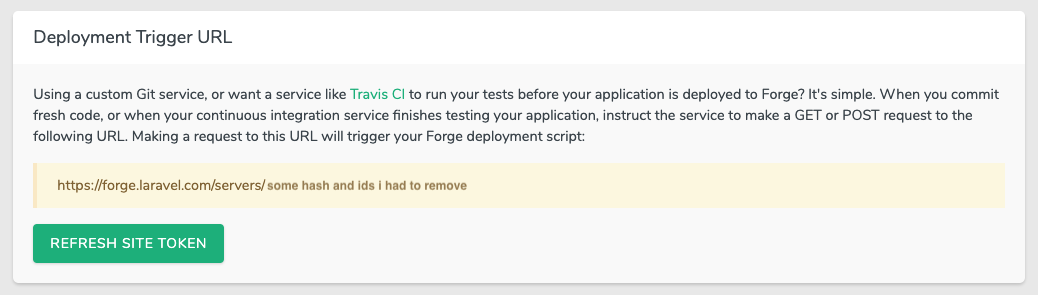
Give it a name, lets call it something like FORGE_DEPLOYMENT_WEBHOOK. For the Value, copy the Deployment Trigger URL form Laravel Forge and paste it in the Value field.
Deployment trigger
Finally we need to add the deploy trigger command to our workflow. Add the following at the end of your laravel.yaml file.
- name: Deploy to forge
  run: curl ${ { secrets.FORGE_DEPLOYMENT_WEBHOOK } }
Now to test it, all you need to do is make some change in your Laravel app and push it to Github master branch. In Github, under Actions tab you can see the progress of our workflow as shown in the screenshot below.
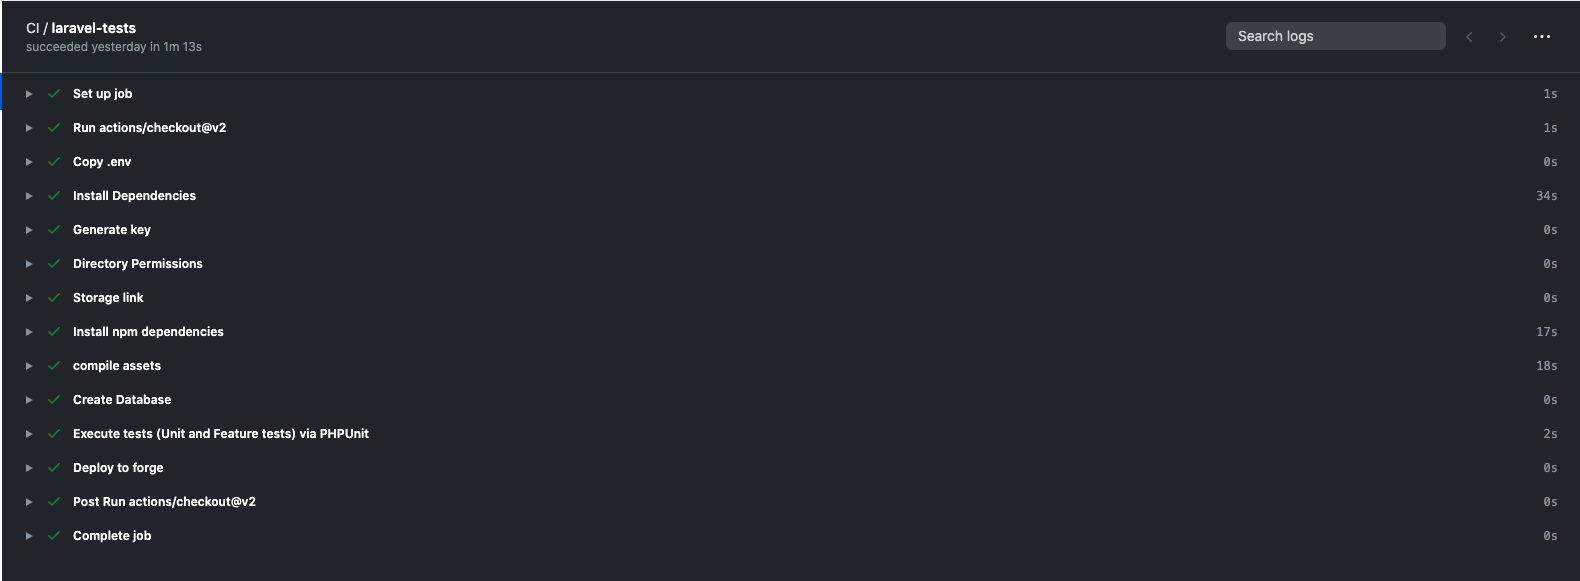
Once the workflow is complete it will automatically trigger the deployment in Laravel Forge and execute the deployment script on the server. Hope you find this article useful 👍